Cleaning background hiss from video audio tracks
|
|
A quick tutorial on removing the background
hiss or inherent noise from the audio track of a video recording. It
takes only a minute or so once you're used to it, and can help clean up
the sound in your video clips. All you need ahead of time is a
pre-recorded clip in a quiet room for the baseline hiss/noise.
Note that inherent or microphone hiss is different from ambient
background noise, as in, the sounds from the environment such as wind or
traffic or ventilation systems. These are harder to deal with since
they are usually quite variable.
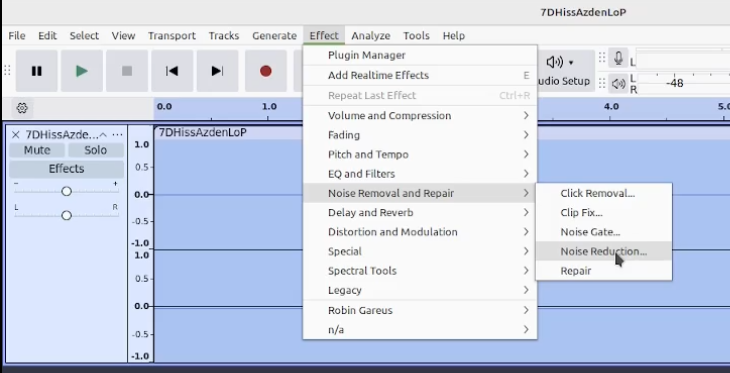
As noted, this works well simply for audio tracks too – just record 4-8 seconds of silence before starting to speak, and use
that portion as the baseline noise profile. Audacity 'subtracts' that
from the entire audio track. Used properly, it can make the background
noise nonexistent and seem like the recording isn't even playing until
you speak.
If you end up using different microphones in different situations or
with different video recorders, as I do, it's best to have silent noise
samples for each combination. It doesn't hurt to actually record the
silent noise sample just before or after you've captured the video that
you need to clean up, so the sample is as closely matched as possible.
Very Important: Don't do any other edits that might affect the
length of the audio clip or it won't match to the video, and you'll end
up doing a lot of synchronizing hoohah. This means no clipping and no
pitch or speed changes. Do these in the video editor after you've synced the audio back with the video.
Audacity sound editing software
Kdenlive
video editing software (though you can use any non-linear editing suite
that allows you to separate the audio tracks from the video.)
As with all projects, the best practice is to always
maintain your original files, so you can easily start again if the edits
turn out to be less-than-ideal –
I have often found that everything sounds fine until I reach certain
points in the recording, where crucial bits were dropped out. I could
easily go back to the original to restore the sections I needed, or
re-apply the noise reduction with better settings.
You should experiment with these settings, too – never assume that if you've had good results with one collection of
settings, that these will be able to be applied wholesale and
repeatedly. And again, err on the side of weaker results that might let a
little hiss come through, rather than being too aggressive and
producing weird distortions, warbling, or dropouts. Remember that audio
recorded outdoors will always have a little background noise,
from wind and traffic and so on, and this changes enough that no one
sample will eradicate it all, but it will likely sound very weird if you
try. Better to simply reduce the overall volume of the track rather
than try to get rid of ambient background noise.
I hope this helps improve the sound of your video productions. Good luck!
 What's this?
