|
|
|
|
|
|
|
|
|
|
|
|
| Understanding "Aperture" | ||
|
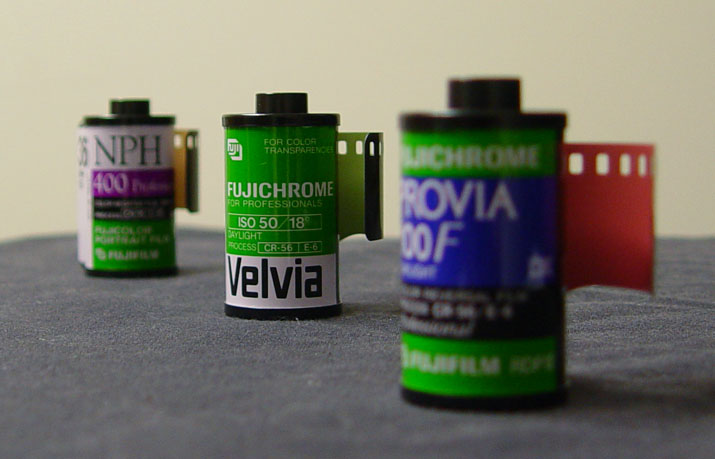
Does your eye jump straight to the Velvia film in the middle? That's one of the tricks of using your aperture to draw attention to the subject you want. This is film, by the way – a lot of people have never seen it... ;-) |
Understanding the aperture within the camera, how it works, and what it does for your photo is one of the hardest aspects of photography. This page is intended to help explain it a bit, and illustrate it where necessary. Please understand that it is not necessary to actually know how it works in order to use it properly, believe it or not, but having this knowledge may help you use it better. And, you may simple be curious as to why it has such esoteric features.
Before I get into detail, though, I'll give you some basic pointers, the most useful info about aperture settings that I can impart. These will be explained further on, but I won't make you read a lot for the key elements. They are:
1) The smaller the number, the larger the aperture. Yes, it's backwards.
2) But the smaller the number, the smaller the depth-of-field.
3) Memorize this sequence: 1.4, 2, 2.8, 4, 5.6, 8, 11, 16, 22. Each step halves or doubles the light through the lens, and is one "stop" of difference.
Those three things are the most important parts of using your aperture. With those out of the way, we'll go into the details.
 Let's
start with what it actually is. When we talk about a camera lens, we're being
incorrect for the sake of convenience. A lens is actually a single shaped piece
of glass (or other optical material) – the part of a magnifying glass or your
eyeglasses that you look through, for instance. But in photography terms, this
single piece of glass is usually called a lens element. A camera "lens"
is actually a collection of lens elements, all fitted together and meticulously
matched to produce a certain affect for the image.
Let's
start with what it actually is. When we talk about a camera lens, we're being
incorrect for the sake of convenience. A lens is actually a single shaped piece
of glass (or other optical material) – the part of a magnifying glass or your
eyeglasses that you look through, for instance. But in photography terms, this
single piece of glass is usually called a lens element. A camera "lens"
is actually a collection of lens elements, all fitted together and meticulously
matched to produce a certain affect for the image.
Within this collection, in a key open space between lens groups, sits the aperture. It is basically a collection of very thin metal blades rigged to extend into the path of the light and block some of it, more or less in the shape of a circle (in reality, the shape depends on the way the lens is made, how big it is, how expensive, et cetera, and may have anywhere from four to twelve sides, with six or eight being most common.)
Why block some of the light? Well, because of the collection of lenses, the light has a range of focus properties. Light in the real world bounces everywhere, reflecting from every surface in all directions. However, the light that passes directly through the center of the lens straight to the film/sensor is the most sharply focused – that's how lenses work. Light that follows a less direct path – for instance, not quite aimed straight into the camera but nonetheless getting caught by the edge of the lens – is bent more, which means it is only in focus at an optimal distance from the camera.
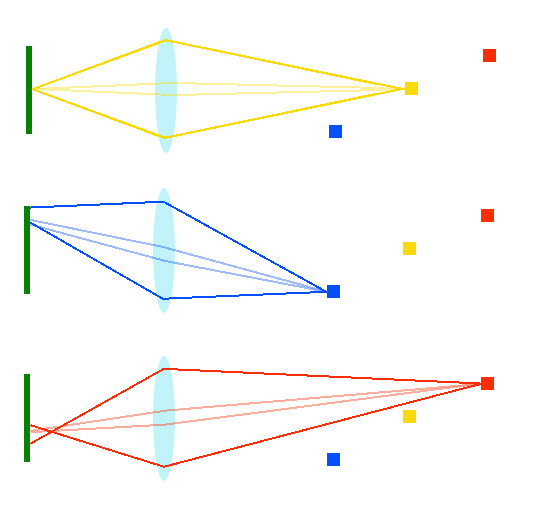 Let's
illustrate it. The image at left shows an imaginary cutaway view of a camera
from the side, greatly simplified. You see the lens (in light blue) and the
film/sensor plane (In dark green.) It also shows three objects, in yellow, blue
and red, in front of the camera at varying distances (not to scale, of course,
but this gives you the idea.) The lens is only focused on the yellow object,
and light reflecting from the object and through the lens is shown by the yellow
lines. Light passing near the edge of the lens, where the glass curvature is
greatest, gets bent the most, while light passing through almost the center
of the lens, practically perpendicular to the glass, gets bent the least. You've
also seen this while looking into water, or into an aquarium of water – straight
in seems undistorted, but at an angle everything seems bent.
Let's
illustrate it. The image at left shows an imaginary cutaway view of a camera
from the side, greatly simplified. You see the lens (in light blue) and the
film/sensor plane (In dark green.) It also shows three objects, in yellow, blue
and red, in front of the camera at varying distances (not to scale, of course,
but this gives you the idea.) The lens is only focused on the yellow object,
and light reflecting from the object and through the lens is shown by the yellow
lines. Light passing near the edge of the lens, where the glass curvature is
greatest, gets bent the most, while light passing through almost the center
of the lens, practically perpendicular to the glass, gets bent the least. You've
also seen this while looking into water, or into an aquarium of water – straight
in seems undistorted, but at an angle everything seems bent.
The idea behind sharp focus is that the light paths we see here, reflecting from a single imaginary point on the focused subject, reconverge as a point on the film/sensor plane – the yellow paths show this clearly. Now, all light reflecting from the subject and hitting the lens has this effect, not just the lines shown here, so these lines, and everyplace in between them, follow representative paths, but I'm only showing two examples for clarity.
Now we look at the blue and red examples, and see something different: the paths do not converge to a point on the film/sensor. That's because the lens is focused on the yellow object, so the light from the blue (closer) and red (farther) objects either doesn't converge all the way, or converges and spreads again – yes, light does this. Instead of a nice point, we get that spread out across a wide area. Remember, it's not just the lines I show here, but everywhere in between, and it's defined by the lens shape, which is usually round. So it's actually a cone of light, and it appears on the film/sensor as a circle. In photography terms, this is called the circle of confusion, and when it comes to a nice small point, that's good focus. When it doesn't, the subject is blurry.
Did you note that the light from the objects that passes through the center of the lens, no matter what the objects' distance form the camera, makes a small cone? Yep, that light is nearly focused, and the closer to the center, the more focused it is. But lots of light is coming through the lens, so the outer edges, which is out-of-focus, counts for more than the narrow path in the center which is in focus, and overpowers it. Now, we introduce our aperture into this mix.
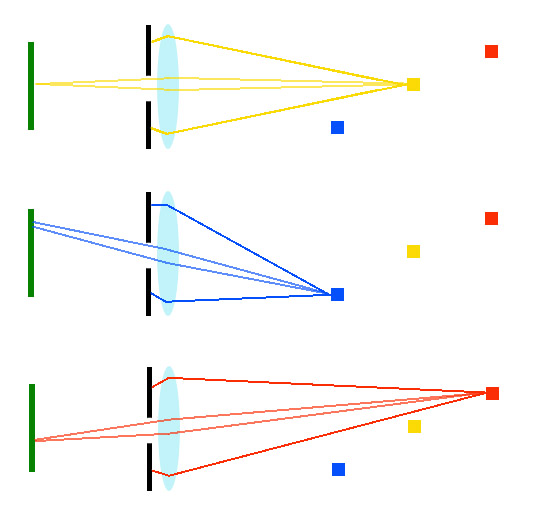 The
aperture is represented by two black lines in this image, but that's only because
we're looking at a cross section of the camera – it's actually a circular opening
(more or less) in the space within the lens assembly. In this case, we're representing
a fairly small aperture setting, maybe f11, and I'll explain that number a little
further on. My illustration doesn't have things perfectly centered, but close
enough to illustrate the effect.
The
aperture is represented by two black lines in this image, but that's only because
we're looking at a cross section of the camera – it's actually a circular opening
(more or less) in the space within the lens assembly. In this case, we're representing
a fairly small aperture setting, maybe f11, and I'll explain that number a little
further on. My illustration doesn't have things perfectly centered, but close
enough to illustrate the effect.
Now, as you can see, the light from the outer edges, that was out-of-focus for the blue and red objects, has been cut off. The light through the center of the lens, however, still gets through, and because the center doesn't bend light much at all, most of the light coming in is now in focus, or pretty close. So when we use a smaller aperture, we actually increase the focus range of the lens, making objects that are farther, and nearer, than our focusing point come into sharper focus. This is referred to as depth-of-field (which I may abbreviate to "DOF" for my own convenience.) The smaller the aperture, the higher the DOF, which means the greater the focus range. With a small aperture, a flower in front of you, and the distant mountain range in the background, can still be in sharp focus at the same time.
Conversely, you may want the background to be out-of-focus, nice and blurry so it doesn't distract from your subject. So you use a wide aperture like f2.8 or f4 to narrow your focus down just to the focusing point.
Wait, smaller numbers mean wider aperture? How come? Be patient, I'm getting to that – it's another illustration, and I'm not done with this one yet.
Notice that the red object is focused tighter than the blue object, almost coming to a point. This is always the case – depth of field always extends farther behind the focusing point than closer in front of it.
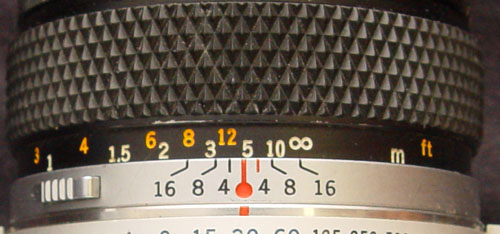 Your
lens may have some peculiar markings on it, looking something like this image.
The markings on the black part of the barrel are the focus distance, represented
in both meters and feet. The red line and dot is the focus pointer, in this
case showing the lens is focused just shy of five meters away.
Your
lens may have some peculiar markings on it, looking something like this image.
The markings on the black part of the barrel are the focus distance, represented
in both meters and feet. The red line and dot is the focus pointer, in this
case showing the lens is focused just shy of five meters away.
Alongside it, in the silver band, are depth-of-field markings – notice they repeat to either side and have pointers. These tell you how much DOF you have at those apertures. For instance, if we use an aperture of f8, we look at the pointers for the "8" and see that focus extends up to about 10 meters, but down to maybe 3.5 meters. If we choose f16, we're down to about 2.5 meters, but up all the way to infinity focus! Everything between 2.5 meters and infinity is in sharp focus.
This, by the way, is called hyperfocal distance, and of course, it will vary depending on what aperture you're using. As those aperture numbers go up (which means the aperture gets smaller,) the hyperfocal distance gets greater.
Now, the problem with all this. As the aperture illustration further up shows, we let in a lot less light with a smaller aperture than with a bigger one. Since the film/sensor needs a certain amount of light to get a proper exposure, making the aperture smaller means we have to compensate in some way, and that usually is, go with a longer shutter speed. But too long, and the image can blur because the camera was moved, or even your subject moved, so like everything in photography, there is a tradeoff, and a certain limit to what you can accomplish.
Okay, let's talk about those silly, backwards numbers. Cameras and lenses differ, but there is a base range of aperture values, and all cameras will have at least some center portion of this range: 1.4, 2, 2.8, 4, 5.6, 8, 11, 16, 22. And these are in order, from largest aperture to smallest. Your camera may have values in between these, but we'll stick to these particular values for a reason.
When we refer to aperture settings, we usually put a lowercase "F" in front, as in "f4." It stands for focal stop, which is an archaic usage, like some other settings on your camera, but at least we know now why aperture has anything to do with focus. But why is f1.4 the largest aperture in this range – why not the smallest?
It helps to know that it is actually part of a fraction, and in reality indicates the fraction that the aperture opening is from the focal length of the lens. Put a "1:" (you might even see this on the front of your lens) or a "1/" in front of the aperture value, and it begins to make sense. After all, 1/4 is obviously more than 1/8, so f4 is bigger than f8.
Twice as big, right? Well, twice the diameter, but this means something else in terms of light. You see, every step in that sequence above lets in half as much light, and subsequently twice as much if you go in the other direction. This step, this increase or reduction, is called a stop. Increase light by one stop, you double it; decrease light by two stops, you've cut it to 1/4 (halved, and halved again.) This corresponds nicely to other settings on the camera, like shutter speed and ISO, and makes it easy to calculate changes to exposure.
But why use these f settings, these fractions, instead of simply giving the aperture size in millimeters, for instance? Because there's a simple, almost ingenious quality to focal length and aperture settings. A setting of f8, for example, allows the same amount of light through a lens – no matter what the lens, no matter what the focal length. Setting for f11 on your 50mm lens is letting in the exact same amount of light as f11 on your 135mm lens, or your 300mm, or your 500mm, even though, technically, those aperture openings are all different sizes. In this way, you can handle exposure changes easily, and it doesn't have to be adjusted for different lenses – they're all the same.
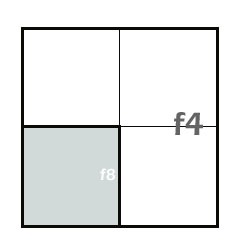 Now,
you might have noticed that the values in that list above double/half
every two steps. But the light halves/doubles every step! And we know that f4
is twice the size of f8, right? Not quite, and if you're sharp with geometry,
you may have already caught this. The (more or less) circular opening is twice
the diameter, but this actually means four times the area. Again,
we'll illustrate this, but it's visibly more useful to use squares instead of
circles – it's the same effect either way. An aperture setting of f4 represents
the larger, outside box, and one of f8 is the smaller grey box. The f8 box is
1/2 the diameter of f4, but obviously only 1/4 the area. So it
lets in 1/4 the light, or two stops less. It's a basic mathematical progression.
Now,
you might have noticed that the values in that list above double/half
every two steps. But the light halves/doubles every step! And we know that f4
is twice the size of f8, right? Not quite, and if you're sharp with geometry,
you may have already caught this. The (more or less) circular opening is twice
the diameter, but this actually means four times the area. Again,
we'll illustrate this, but it's visibly more useful to use squares instead of
circles – it's the same effect either way. An aperture setting of f4 represents
the larger, outside box, and one of f8 is the smaller grey box. The f8 box is
1/2 the diameter of f4, but obviously only 1/4 the area. So it
lets in 1/4 the light, or two stops less. It's a basic mathematical progression.
I mentioned that your camera may have other values, falling in between the list I gave. The reason for this is, you may want to be very meticulous about exposure, and some films were very sensitive to minor changes, so these settings allow partial stops, smaller incremental changes to exposure rather than doubling or halving the light. You might have half-stops, or 1/3 stops. So the aperture settings in your camera might go something like 4, 4.5, 5.6, 6.7, 8, 9.5, 11, 13, 16, and these would be half stops in between the main stops listed in bold. Or your list might look like 4, 4.5, 5, 5.6, 6.3, 7.1, 8, 9, 10, 11, 13, 14, 16, and these would be 1/3 stops in between the main stops listed in bold. You'll notice some overlap in those numbers between the half and 1/3 stop increment list, or your camera might even have slightly different values – this is only rounding to a nearer value so you don't have to deal with more than one decimal, and doesn't actually affect your exposure at all.
Yes, it can get confusing, which is why I recommend memorizing the main list: 1.4, 2, 2.8, 4, 5.6, 8, 11, 16, 22. It becomes easy to calculate stops, then you'll know when you're dealing with partial stops in between, and how much it might affect your image.
Other details. There are other things about aperture that should be noted, even though not all of them will do much for your photography. I mentioned above, for instance, that you might see a notation on the front of your lens that says "1:4.5" or similar. This denotes the maximum aperture of the lens in that fractional style – you can replace the colon with a slash to make it "1/4.5" if you like, or simply do away with both and make it "f4.5". Do not confuse the "1:" with a "1." or in other words, believe this is something like an f1.4 lens. Look carefully. The difference between such lenses can be a lot of money, so best not to mistake one for the other.
Your lens may read something like "28-105 4-5.6" on it, again, usually on the front ring, but they'll also be sold this way. The first range of numbers, 28-105, is the focal length, and this indicates a zoom, ranging between 28mm and 105mm. The second range is aperture of course, but not the total range of available apertures (that's a very small range,) but instead the maximum at both ends of that zoom range. So at 28mm, the lens has a maximum aperture of f4, but zoom to 105mm, and the maximum is now only f5.6.
How come? For two reasons. The first is, because zooming the lens creates a longer tube, which allows more light to disperse inside. Look through the paper roll from paper towels versus toilet paper, and see the difference, even though both are the same diameter. But the second reason is a little bit sneakier. Remember above where we found out that the aperture value is a fraction of the focal length? Ahhh, getting it now? Increase the focal length, and in order to keep the same aperture value, the aperture actually has to get physically bigger. Most lens manufacturers don't do this, so the aperture value naturally shrinks as the focal length gets longer. It doesn't change in size, it just can't compete with the focal length.
You may also notice that having a large maximum aperture for a long focal length lens, like a 300mm f2.8 or a 500mm f4, gets very expensive. Again, it's that long tube thing, and in order to have a lot of light going through, you make a cone shape instead of a tube. This means the front lens elements have to be very big, and it gets expensive to grind these. Then, there's the factor that the photographers who want lenses like this are often professionals who have further demands of their images, so the element materials are usually very pure and have additives to prevent aberrations in the light passing through – plus the fact that, if you're a professional, you can afford to spend a lot for the lens, right? Unfortunately, this factor plays far too much of a role in equipment pricing.
 |
| A good example of a short DOF, the starburst trick, a "ghost" (top right) and how single points of bright light can show the circle of confusion (towards bottom of image) |
Lenses with large maximum apertures are often referred to as "fast," and the reason is, the amount of light coming in means the shutter does not have to be open as long to allow for a proper exposure, and can thus be shorter, or faster. There are two other benefits of fast lenses, too. The first is, depth-of-field can go very short, allowing for better "isolation" of the subject from the background. And the second is, they're easier to focus.
Why is that? Because the aperture of the lens does not actually move when you make adjustments to the settings – not immediately, anyway. The aperture stays wide open until you press the shutter release, whereupon it snaps closed very quickly, often while the reflex mirror is slapping up out of the way if you have an SLR camera. This allows the maximum amount of light to come into the viewfinder right up until the photo is taken, which makes focusing much easier. Lenses with larger maximum apertures produce brighter viewfinder images.
Many cameras have a depth-of-field preview function, which lets you close the aperture down to what it will be when the shutter opens, so you can see just how effective your aperture setting is on your depth-of-field. More or less. The problem becomes, this makes the viewfinder go darker, sometimes a whole lot darker, and it becomes too difficult to tell what the depth-of-field really is anyway. For close subjects, you can sometimes use a bright handheld light, like a flashlight, to shine on your subject and make it brighter in the viewfinder, but this obviously has limitations.
There are tricks to making the most of depth-of-field. Wide angle lenses (shorter focal lengths) provide the greatest DOF, while telephoto (longer focal lengths) provide the shortest. As noted above, DOF gets longer the closer your lens gets to infinity focus, so one trick to produce extremely short DOF is to use a long focal length, but have your subject as close as possible.
With a bright point source of light in the frame, such as a tiny reflection or the sun peeking through the trees, using a smaller aperture will turn the point of light into a starburst, with "arms" that correspond to the number of aperture blades.
A point source of light that is well out of focus, though, will often take on the shape of the aperture itself as a soft "ghost" in the image. This is because the point of light creates a circle of confusion that is cut off by the aperture blades. You usually only see it because the bright light is overwhelming the darker portions of the image, which are just as out-of-focus.
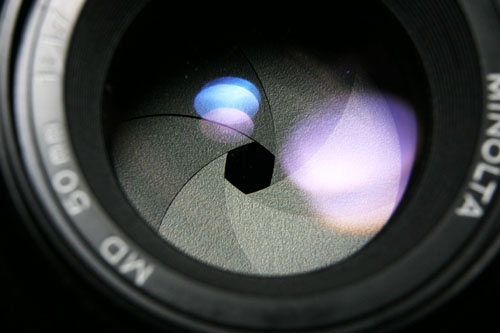
Another thing that produces ghosts is bright light hitting the lens, but not in a direct enough line to reach the film/sensor. If you go back up to the focus diagrams above, it's easy to see that light can be coming in from a wide point to the side and never reaching the film/sensor plane. But, remember that there are multiple elements within the lens assembly, and it's possible to have light reflect from their surfaces – most lenses are coated nowadays to help reduce this (see the different colors in the photo of the aperture near the top of the page,) but it can't do away with it entirely. So sometimes you see these reflections in the image when they bounce back to the film, very often in the shape of the aperture. This is called "lens flare" and generally hurts the image, throwing ghosts and reducing contrast and color saturation. A proper lenshood can prevent most of these, and being aware of facing towards bright light sources is important. If you can see bright light shining directly onto your front lens element, you're probably going to have flare.
 Another
common nature photographer's technique (or perhaps field) that produces extremely
short DOF is macro photography. Working at very high magnification makes DOF
drop extremely short – as in, measured in less than a centimeter, sometimes
only a millimeter or two. The greater the magnification, the shorter this is,
and the aperture physically cannot get small enough to counter it.
Another
common nature photographer's technique (or perhaps field) that produces extremely
short DOF is macro photography. Working at very high magnification makes DOF
drop extremely short – as in, measured in less than a centimeter, sometimes
only a millimeter or two. The greater the magnification, the shorter this is,
and the aperture physically cannot get small enough to counter it.
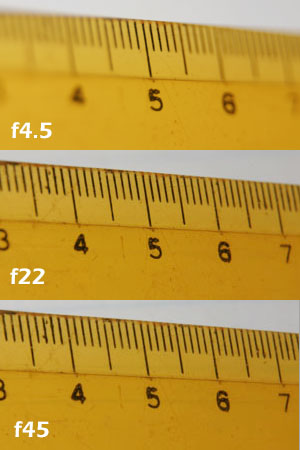
In the image at left, we can see three examples of shooting very close at different apertures – the subject is actually a ruler marked in centimeters, focused on "5." Bear in mind that the ruler was photographed at about a 45 degree angle, so the millimeter markings are not accurately portraying depth-of-field in the least, but actually much shorter than indicated by the ruler. Also know that these examples were cropped from a wider frame, so DOF is even worse than you're seeing here. It's easy to see that f4.5 only shows minimal depth, while f22 is substantially better. And f45 improves this still, but by a much smaller degree. And, it comes with a price.
There is a diffractive effect from light along the edges of the aperture blades. When the aperture is in normal ranges, this barely has an effect on the photo because the undiffracted light coming through the opening overrides the diffracted light from the edges, for the most part. But when the aperture is closed down very small, usually f22 and beyond, much of the light reaching the film/sensor through the tiny aperture is diffracted by the edges, and can soften and distort the image.
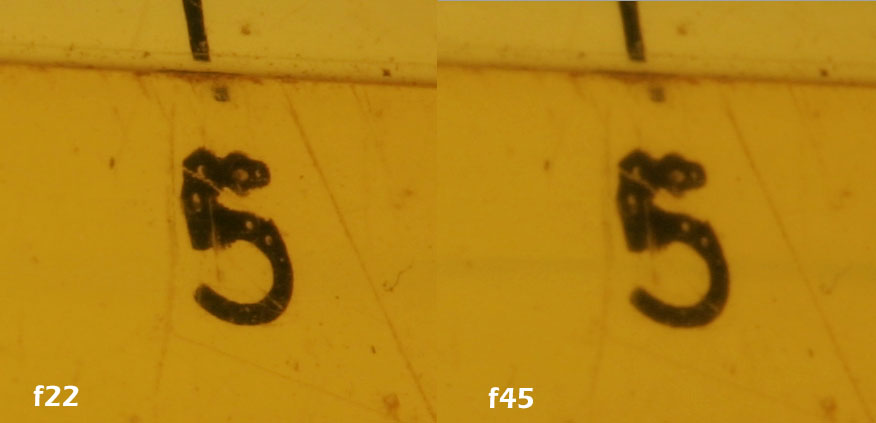
The image below shows two full resolution crops of the same frames we just saw, taken without moving either the camera or the scale between them. You can see that f22 produces a certain level of sharpness, but f45 actually reduces it. This is the result of diffraction, another of the limits within photography, most especially macro photography. You should also know that the three images used to illustrate this were taken with a strobe very close to the subject, to throw enough light for an aperture of f45 to even be feasible.
So, there you have it, everything you never wanted to know about your camera's aperture. Optical effects can be really curious, but a lot of work goes into cameras to make them work as efficiently as they do, and as we found about the backwards, strange progression of aperture values, there are very good reasons for things to be the way they are. You may not use all of this knowledge in your photography, but now at least you'll know how to achieve certain things, and where some effects in your photos come from. I hope you get some decent use and understanding out of this page!
Good luck!
 What's this? What's this?
|
 |