|
|
|
|
|
|
|
|
|
|
|
|
| Photographic Preparedness | ||
 |
||
|
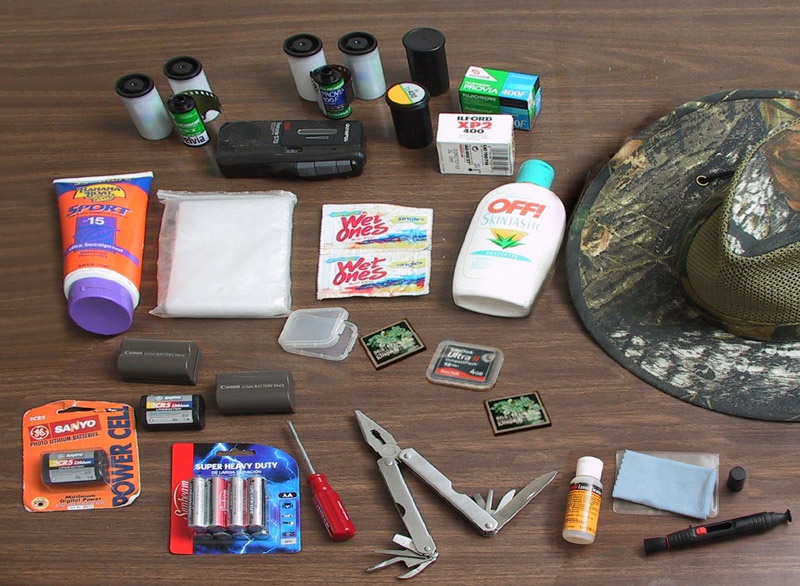
Just a selection of the additional items you may want to have with you. Yes, this photo is old. |
I should have done this long ago. Photo technique, knowledge of using the camera, and of course a familiarity with composition is important to photography. But equally important is being prepared for an outing; in fact, it could be argued that in many cases it's more important, since occasionally it may affect one's health and safety. So let's talk about being prepared.
The first bit is, know what you're doing for the outing. This means the weather conditions that are expected or predicted, but also the conditions that might occur – it goes without saying that weather reports aren't always, um, precise. Refer to this page on hot weather tips, and this one for cold weather, to assist a little more along those lines.
But it also means, knowing what conditions you'll be encountering. Hiking? That means good solid shoes with great traction. Wading? Then waterproof sandals or high boots, and clothes that dry quickly. Adequate water to drink, of course. It helps a lot to have a lightweight jacket or windbreaker, one that repels water but rolls up into a tight mass for when you don't need it, making it easier to lug around.
How about the area – know it very well? This is best to get familiar with before you head out. And a word about cellphones and GPS receivers: don't count on them. They fail, they break, they struggle to get signals, and they get wet. Know what to do without them, and treat them as a bonus, not as a necessity.
As another backup, someone else should always know where you're going, as precisely as possible. This also means an expected timeframe of when you should have been back. You should also be able to direct emergency services to your location without fumbling for creek names or crossroads.
Your camera bag, naturally, should protect your equipment, not just from banging around, but from rain and snow, drops (including you landing on it, if possible,) dust and stray leaves, and smaller bits of equipment falling out as well. It should be comfortable for extended sessions – having a lot of weight on one shoulder is not only uncomfortable after a while, it's seriously bad for your back over repeated use.
There's more to this, too. Heavy bags that shift or bang around can actually affect how you walk, climb, or hike, and if you stoop to do macro shots without kneeling on muddy or rocky ground, some shoulder bags take that opportunity to swing around in front of you. And hanging the camera around your neck with any kind of activity is just asking for it to swing and bang around.
Backpacks can hold a lot and are optimal for carrying loads – but, unfortunately, not for getting at them quickly. Good luck if you're in an area, like in the mud, or actually in the snow or a stream (see the website title?) where you cannot set them down to rummage within. My personal preference is beltpacks and camera holsters, but the point is, you need what fits your uses and activities. Spend some time thinking about this before you purchase your next bag.
How much equipment you carry is another personal decision. The more you have, of course, the more you're prepared for, and especially with nature photography, you never know what you might encounter. But lugging it all around means weight, and the greater chance of ruining all of your equipment if you inadvertently fall into the water or drop the bag off a rocky slope. In some cases, a light kit, while leaving you unprepared for some possibilities, is better to cope with the guaranteed conditions.
Within your bag should be not just your shooting equipment, but a range of other items too. Some suggestions:
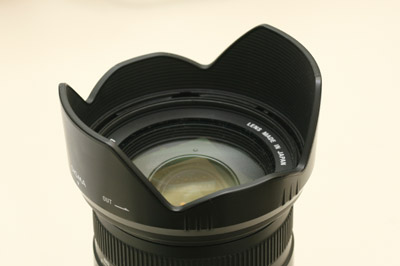 [A
small side note here. Many wide-angle lenses benefit best from a
'tulip' or 'flower' or 'cutout' lens hood, one with a peculiar,
non-conical shape. The wide field-of-view is a lot more able to catch
the sun directly, which will affect the photo, but shielding this in a
normal manner would result in ridiculously large hoods, so a workaround
is used where a narrower hood is 'cut out' right where the photo is
widest and the hood would intrude into the image: the corners of the horizontal frame. But, with lenses where the front element rotates to focus, the hood rotates too, so a cutout hood needs to be realigned every time
focus shifts. The lesson from this is that manufacturers should never
make lenses where the front element rotates. And we the consumers should
never buy them... ]
[A
small side note here. Many wide-angle lenses benefit best from a
'tulip' or 'flower' or 'cutout' lens hood, one with a peculiar,
non-conical shape. The wide field-of-view is a lot more able to catch
the sun directly, which will affect the photo, but shielding this in a
normal manner would result in ridiculously large hoods, so a workaround
is used where a narrower hood is 'cut out' right where the photo is
widest and the hood would intrude into the image: the corners of the horizontal frame. But, with lenses where the front element rotates to focus, the hood rotates too, so a cutout hood needs to be realigned every time
focus shifts. The lesson from this is that manufacturers should never
make lenses where the front element rotates. And we the consumers should
never buy them... ] Everything has a place. Your method of carrying equipment should be organized, and you should maintain the habit of immediately putting something back where it belongs when done. This lessens the chance of misplacing something or losing it from an open bag, and makes it easy to spot-check that you have everything. The crucial stuff, naturally, should be easiest to check, not buried in the depths where it will take a while to realize that you don't have it.
A ground cover. Oh my gosh, how much this can help! I have used several variations, but the idea is, something to put on the ground to protect you from dampness, rude insects, or just general outdoor dirtiness when sitting, kneeling, or lying on the ground for those amazing shots. A small piece of plastic tarp (75cm/24in square or so) can easily be folded up to stuff into a large pocket or the side of your camera bag, but I've also used a small thin auto floor mat, a cheap welcome mat, a carpet tile (doesn't roll up,) and other odds and ends. Small pro tip: always fold it up so the 'down' side is inside – keeps grit from brushing off within your bags and keeps you from using the down side mistakenly as the up side and thus defeating the purpose. I also frequently use carpenter's knee pads. Someday I will start a photographer's clothing line with pants that have lots of big pockets, and padded vinyl sections in the seat and on the knees...
How to clean lenses.
Some of this is personal preference, but here are the whys and why-nots.
First, hold lens inverted (like, above your eye level aimed downwards) and blow gently while brushing with a soft brush. This is to dislodge grit, sand, and other abrasives that you do not want to push around on the glass surface. Even a microfiber cloth will scratch a lens when it pins down a bit of sand.
The dry method (lens pen): Start in the middle and work outwards in a circular motion. The center of the lens will be the most free from grit, the edges the worst, so this way you don't grab grit from the edge and push it into the center. Huff onto the lens to introduce a very small amount of moisture if there's something stubborn. Clean off padded tip frequently so it does not retain stray grit.
The wet method (fluid and cloths): Apply a drop of two to the cloth, never the lens itself – it may run down to the edge and seep within, introducing moisture that may never come out. Start at the center and rub very gently in a circular motion to the outside (see above.) As needed, use a dry cloth (or corner) to soak up any streaks that might occur. Note that microfiber cloth is not terribly absorbent, so use fluid sparingly just to avoid having to sop it up repeatedly.
Lens cleaning fluid is fine, especially that formulated for cameras, but a 50/50 mix of ammonia and alcohol (good stuff, without fancy additives for 'massage' or whatever) is as effective as any lens cleaning fluid, and exponentially cheaper.
A note about microfiber cloths, and indeed any cleaning cloth. They can retain detergents which you will introduce to your lens, never fully getting them clean, so wash such cloths in something like baby shampoo and rinse repeatedly. Never, ever use something like fabric softener, which is essentially wax – feels soft, but ruins absorbency, and will transfer to the lens.
Heading out
Weather
There are a couple of outside pages with extended tips on hot weather and cold weather, so be sure to check those too.
Never go out on anything more than a short hike without checking the weather – and at the same time, prepare for all variations possible on top of that, since we all know the accuracy of weather predictions is haphazard. My bags always have a disposable rain poncho within them, as well as the standard rain covers, and if the risk of precipitation is greater, several larger zip-lock bags are added as well.
But temperature variations are important to prepare for too. It can be a pain to lug around a jacket or sweatshirt when the weather is warm, but a sudden drop in temperature can make it necessary. Most especially, a heavy storm will not only soak you, it may drop the temperature significantly while bringing stiff winds, and that can even invoke hypothermia. I shouldn't have to talk about desert conditions, but will anyway: the temperature variation between day night can be huge, so you'd best be prepared.
Another desert tip: canyons and narrow passes can flood very suddenly, without any warning, including any visible rain – the lack of topsoil to soak up water means it simply runs off, and might do this from a long ways off up the mountainside. Whenever you visit such areas, ensure that you are never more than a few minutes from an exit. It goes without saying that you never, ever camp there.
The further you travel, and the rougher terrain you cross, the more likely you are to encounter weather variations. Basic rule: the longer you will be out, the more you carry with you.
A hat, of course – a broad-brimmed one help tremendously in keeping the sun out of your eyes and off your neck, and the rain or snow from both. I prefer one with a ventilated crown because otherwise the heat can build up within.
Cotton clothing is a major plus – breathes well in hot weather, sheds water and sweat quickly. Wool is highly recommended for cold weather, especially when the chance of getting wet is high. While synthetics can wear well and repel water, they can also trap heat and moisture within – better for an outer wrap than as your main clothing.
Some thoughts on getting around in tricky terrain.
First off, we have a peculiar, human outlook. We take chances; we bet that something bad won't happen – and every time we take such a chance and pull it off, we get more confident. This is not how chance works. We're not proving anything here, and accomplish nothing by trying to exploit the odds. The minor inconvenience of doing something more safely is much better than the major 'inconvenience' of getting injured (or killed) or damaging equipment. Don't let impatience, machismo, or misplaced confidence dictate your actions.
Walking sticks are certainly handy, but it means something in your hand most of the time, which hampers your ability to handle the camera or anything else, and if you lay them down, then you stand a chance of forgetting them. Just keep it in mind. An extended tripod or monopod can do the job in a pinch, but it's important to note that they're not designed for this – they may collapse on you if you put too much weight on them. However, most of the store-bought, dedicated walking sticks that I've seen are actually weaker than a good tripod/monopod anyway – they're intended for steadying and bracing, but not supporting. Use your own judgment here.
Wading technique
It is extremely easy to fall, ruin equipment, and/or get hurt when wading, so here are some tips from someone who's been doing it for years.
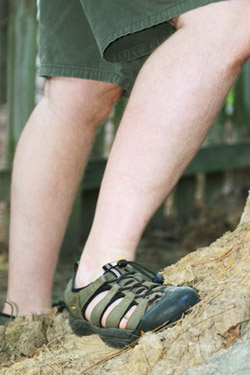
Good traction shoes. I prefer the 'outdoor' sandals with nylon webbing (see photo below,) but whatever's the most comfortable for you. However, I strongly recommend against open toes. When your foot slips and jams down between some rocks, you'll thank me.
Go slow. Three hazards come up constantly: rocks that are poorly seated and can shift, rocks coated with algae and silt to make the the most slippery surface possible, and just not being able to see the bottom clearly enough through rippling and unclear water. So, keep one foot placed and your weight centered on that, and extend the other out in front of you, feeling your way. Lean on walking stick, monopod, or tripod as necessary. Find a foothold, wiggle it to see how steady it is, then slowly transfer weight towards it – this is when you'll find out it's not as steady as it first seems. Always be ready to shift back as needed. Do not transfer your full weight until you're quite sure the foot is seated adequately.
Look at the rocks. The ones with the flattest, most level surface are best of course, but if they have a patina of fine mud or discoloration on them, this is often a sign that they're extremely slippery from silt and algae. At such times, it can be better to avoid the rocks and stick with a muddy bottom. Never assume a rock is seated – try to keep weight in the center as much as possible, and don't 'push off' if this can be avoided. Jumping across rocks is extremely hazardous – all it takes is one that isn't stable, and you're going down.
Walk flat-footed. Our normal walking tendency is to flex the foot, landing on heel and pushing off against bent toes, but this introduces a lot of side pressure that can lead to slipping. Walk like Frankenstein's monster instead (the yummy-sounds are optional. Don't make me explain that.)
Don't have the camera in hand when doing this. Just don't. Have your hands free to brace your fall, or even just flail for balance.
Climbing technique
This takes practice, and should be done with the recognition that a fall is likely. In other words, don't go higher than you want to fall, and think about how badly you can break a limb on those rocks.
Don't have the camera in hand. Or around your neck, or even sitting in the open bag. Seriously. Pack it up tight – think of the bag rolling down the slope.
Shoes with excellent traction, tread, and a bit of flexibility. You need to dig into mud and grab uneven surfaces of rocks.
Get a grip. The safety grip with at least one hand – on a tree, solid rock, or even just into the stronger grasses of the slope – is additional leverage and protection. I have ended up dangling from one hand at times, but uninjured and without damaging any equipment.
 Turn your feet sideways. Think leverage – your weight comes down from the ankle, so the heel has the most direct pressure. Thus, don't dig in your toes and offset that weight away from where you contact the surface. Your toes are only for use when the surface won't accommodate your heel – and that's a dangerous situation, one to avoid.
Tackle slopes indirectly. Just like when driving up a hill, it can be easier to go at an angle, crosswise rather than directly. It uses less leverage, less pressure on the questionable surface, and less energy.
The shortest path may not be the safest or easiest. Examine the area carefully – sometimes there's a better route only a few meters away. You're not after any speed records here, but getting up or down safely.
Look at the surface. Look for flatness, clarity from gravel or mud, and rocks big enough that they won't dislodge. When tackling a muddy slope, the grasses hold things together – avoid the bare earth surfaces altogether. There will always be undulations, so look for the portions where the slope flattens a bit into a natural 'step.'
Small steps. The wider your stance, the more pressure and leverage you're putting on the slope. Try not to.
Keep your weight directly above your feet as often as possible. Often, this means leaning a bit. Again, we walk with our weight offset too often, and you have to break this habit, use leverage to its best advantage. Plus, if you're leaning into the slope and you slip, you will fall flat against the slope instead of away from it, going for a slide that is easier to control, rather than a tumble that is not.
Think like a quadruped. Your arms are useful – put them to work as needed, at the very least remaining ready to stabilize yourself when your feet slip, but if you get better traction by going up a slope on all fours, then do so. We automatically throw out our hands for balance and bracing a fall anyway, so assume it will happen and keep them ready, which means unemcumbered and out in the direction we're most likely to fall (which if you follow the advice above, means towards the slope.)
Back down as needed. If you're heading down a steep slope, treat it as a ladder – you don't go down those as you would stairs, do you? Again, what might happen if you miss your footing is a guideline, and when backing down it's easier to lean into the slope for more stability.
Know where you put your hands. In snake country of course, don't reach out of sight to grab a rock or ledge – 'nuff said. But a handful of briars or poison ivy isn't recommended, either.
Leaves are the enemy. They slide easily, and mask damp or wet areas from sight. They also gather in hollows and disguise holes. They're camouflage for most of the hazardous species. And there's even the bit where they make a lot of noise and alert wildlife and Bigfoot. They can make great photo subjects, but other than that they are to be avoided.
A note about safety and protecting equipment. Yes, camera equipment is expensive. And we, as a species, tend to treasure our possessions, which is not exactly a bad trait when replacing them might cost us a lot. But the equipment comes second behind our health. This is something to come to terms with now, because it should be automatic when it has the most impact. If we're falling with our camera in hand, especially in a situation where the chance of serious injury is significant, the camera should be ignored. An emergency room visit costs more than just about any equipment out there, and it's stupid to sustain an injury that could have been avoided by sacrificing the photo stuff. Not to mention the difficulty of getting out of wherever you might be when it happens. This is partially why I say to stow the equipment before doing something tricky, but even in an unexpected, unpredictable accident, if saving your butt means dropping the camera, do it.
Not getting lost.
This takes, mostly, presence of mind. As mentioned above, knowing where you're going before you actually arrive helps a lot, and a detailed terrain map is always useful, though not always available. Once again, do not count on cellphones – they can lose signal, have batteries die, or get smashed in a fall. Always treat them as a backup, not as a solution.
A dedicated GPS unit is much better than a cellphone with GPS capabilities, for the simple reason that the entire device is intended strictly for such usage – they're tougher, have a better antenna, and do not rely on gimmicks like measuring distance to cell towers instead of GPS satellites. As above, however, they can fail.
Pay attention to the route you're taking. Most especially two particular facets: what each turn looks like, including from the other direction (the direction you'll be facing on the return trip,) and what it might look like when it gets dark. Subtle trails that are easy to follow in daylight can disappear in darkness or even twilight, as well as due to rain or snow. Be aware of how to spot the turns you'll need to take without relying on the ground path.
Where a phone can come in handy: By taking photos of the crucial turns, or being used as a memo recorder for a reminder of the same. But the same warnings apply regarding failure. A small bonus from this technique: speaking out loud can do a lot for burning the memory of the info sharper into our minds – it builds more connections and thus improves recall.
A compass: Actually, only of use if you know how to use one. Following any trail or terrain usually means twists and turns all over the place, and you'll almost certainly not be heading in one compass direction, so using a compass to get back only works if you have a meticulous map to work from, or know that 310° will bring you to the river that comes around to where the car is parked. An orienteering course is more of a necessity than a compass (even when it requires a compass.) But while we're at it...
The sun tells you a lot. If you remain aware of light direction, you have a rough idea of which way you're headed – but this takes specific effort, and of course it changes throughout the day, not to mention becoming almost worthless at night. I say almost because the moon can be used the same way, as well as some knowledge of constellations, but chances are if you're lost, you won't have a clear enough view of the sky to use this anyway, not to mention bad weather completely screwing this up.
Know when night falls. Being lost in the dark is not only much worse than almost anyone imagines, it can get downright dangerous because of missed footing, dropping temperature, and the remarkable ease at which one can get way the hell off track without realizing it. Be back by sunset, unless you have specific control over exactly where you are and how to get back.
Pay attention to your limits. This includes getting overheated or too cold, getting blisters, getting dehydrated, and getting too much sun. Sunscreen has to be re-applied periodically. Temperatures change during the day. See the bits above about wading and climbing? Now imagine hiking for kilometers/miles with wet clothes that are chafing as the wind picks up, or with a twisted ankle. Water bottle half-empty? Time to begin the return trip.
Night trips.
There are times and subjects where being out at night is very useful, perhaps even the only way to get some kinds of shots. But it takes extra preparation.
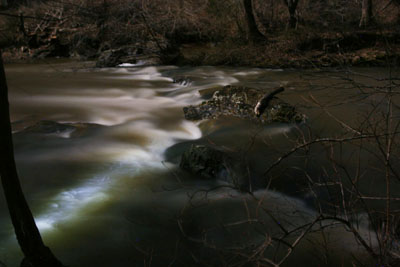 |
Note the stray light beam coming in from the left... |
Good headlamp. Something bright, that doesn't throw too narrow a beam. It should be intuitive to turn on and off. Many kinds now have variable brightness, focus, and/or different colors to permit night-vision to remain – these options tend to let the batteries last longer, so use them as often as you safely can. And of course, you will have spare batteries, and two sets are recommended, as well as a backup light (a pocket flashlight is usually adequate.) Remember that batteries drop drastically in power output when they get cold and will die quickly (but will usually come back when warmed up again,) so keep spare batteries in next to your body heat in colder weather.
A small note about a pocket flashlight: If you're out at night, you're probably doing long exposures, and it's really easy to flash a headlamp's beam through your photo while it's being taken. When the shutter is open, use the pocket flashlight, which is easier to aim and will typically not throw as much light. Best, of course, not to use any light at all, but sometimes it's necessary.
The preview image on your camera LCD will ruin your night vision for a bit, by the way, and using it to judge whether the exposure was adequate is difficult. Just a warning.
Really knowing where you're going. You should never visit someplace for the first time in the dark. Daylight provides so much more information about location, hazards, and options. Get to know the trails and terrain well, and think about what it would be like with a total failure of all lights.
Wildlife is different at night. Overall, not a huge difference – in North America, only a handful of species pose a real danger, and you should already be familiar with them. But yes, bears and mountain lions are often more active at night and thus the chances of an encounter are greater. More likely, however, are snakes, which often seek rodents that are nocturnal, and are commensurately harder to spot by flashlight/headlamp. Also, spiders are far more active at night, and in the woods during the warm months you will be walking through webs – if this bothers you, night work in the woods probably isn't for you, but at least have a long stick to wave in front of you. And then there's the chance of encounters with skunks or raccoons. Just be aware.
You're harder to find at night. If you fall, somebody trying to find you will have a much harder time, and waiting until daylight (especially if you'ver been knocked unconscious) greatly limits your chance of survival. Not to be morbid, but TV and movies don't inform us adequately: a bad fall at night is much more likely to prove fatal. In other words, don't ever let the risk present itself.
Is that enough? I'm hoping I didn't forget anything, but check back anyway. Good luck!
 What's this? What's this? |  |